 HEI
Conversion
HEI
Conversion
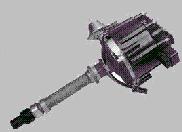
AH, the wonderful High Energy Ignition, Some hate it, some love it. For the street, and a mild engine, it works great. So you want to install an HEI, well, on our vehicles, it is simple!!!
You can go two different routes with this. First, you can do a half ass job and just add a wire, and it will be just that, a half assed job. If you want the clean look, you can modify the stock engine harness and conceal your wiring in it for a stock and clean appearence!!!
A quick note here, this conversion as portrayed in this tutorial is correct for 63 only, other years will follow the same principal, but the acctual pins at the bulkhead connector may be different. I am not responsible for any problems, damage, bonehead screwups, or just plain mistakes made with the information that follows!!!
In this tutorial, I provide information on how to build a harness from scratch, you may or may not desire to build a complete harness. I chose to do a complete harness to also wire my tach in the same harness.
Lets get started!!
1.) Your first and most important step is to find a engine wiring harness. It does not matter if it is all hacked up, the only thing we are interested in is the main bulkhead connector! It should be a plastic connector with slots for 8 small pins. Make sure this is in good condition, and not brittle. This little piece is the foundation of our wiring harness.
2.) Now that we have the connector, you need to remove the pins. It would be a good idea to have a wiring schematic to reference, or you might not be able to get the pins back in the correct position. Schematics are available HERE.
3.) We need to fashion a pin removal tool. The best and easiest that I have found is a finishing nail. Grind or file the tip flat, and do the same to the sides for about a inch. You want the tip and sides flat and about 1/16" wide. Once this is done, we can pull the pin.
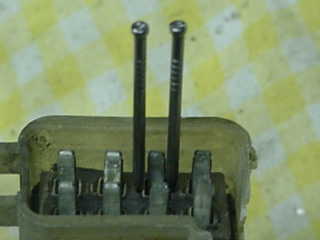 Here I used an old connector to demonstrate how to remove the pins.
Insert your pin tools on either side of the pin as shown, and depress the pin locks, slight force is needed, carefully push the pin out of
the socket, a slight wiggle action may be required to break it loose
Here I used an old connector to demonstrate how to remove the pins.
Insert your pin tools on either side of the pin as shown, and depress the pin locks, slight force is needed, carefully push the pin out of
the socket, a slight wiggle action may be required to break it loose
4.) Now, you have two options. You can try to uncrimp the pins from the wires, or you can go to the local Chevrolet dealer and visit the parts counter. They should have these pins in stock! Make sure you get about 10 of them, you never know if you will need them!!!! I got 10 new pins, paid about $3 for them.
5.) Make sure you note what positions the pins were originally in on the connector. Use the small bump on the outside of the connector as a reference!
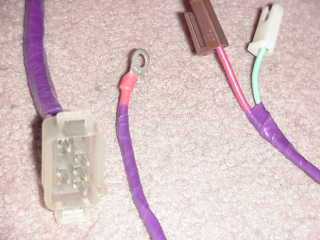
6.) You should have a total of 6 pins(Not sure about that on SS models) 1. for the 12VDC from the fuse box to the "S" terminal of the starter. 2. the resistor wire to the "R" terminal of the starter(we are replacing this one!). 3 and 4 should go to the wiper motor(pay attention to the positions of these wires, they are color coded). 5. goes to the oil pressure sender. 6. goes to the temp sender. Clean the connector really well, and retain it for later. NOTE: the wires are not numbered in the connector as I have described them, be carefull and reference you wiring diagram!!!!
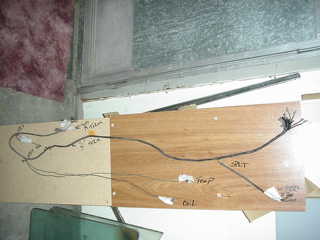
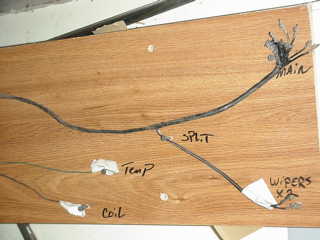
7.) Get a piece of plywood or some type of board. Lay out the original harness on the board. Now use screws or nails to mark the beggining, end, and branches of the harness.(see pics)
8.) For those of you who are going to reuse the wiper, oil, and temp wires, you need to carefully split the harness and remove those wires! For the rest of us, we will run new wire. You can remove the stock wiper connectors with a small pair of pointed tweezers from the front side of the connector and push it out the rear, then uncrimp the terminal by carefully prying the small arms apart, then recrimp on your new wire.
9.) Now, take your new wires, Color coded of course, and start running the wire. Use the nails or screws to wrap your wires around for your beginning, ends, and braches. Make sure you leave the wire slightly longer than stock so that you have enough to play with when fitting the harness in the car.
10.) Now, something to consider. The resistor wire that you are replacing in factory terms is connected to the "R" terminal of the starter. You no longer need a wire to run to this terminal. The wire that replaces the resistor wire will now go directly to your HEI coil. This means that you can eliminate the wire that went from the "R" terminal to the coil.
11.) For those of you who want that clean install, you can get the correct connector end for the HEI from your GM dealer parts counter. The part # is 891-7052 it should be a brown connector with a clip on it. Your dealer will also have the correct pin to go with the connector, it is not included with that part number. If you just want to hookup and go, a standard spade terminal will do the trick
12.) If you want to wire your tach in the same harness, get 2 connectors and use one of the small pins from the bulkhead connector to do your hook up. You will have to pull the fuse box out to wire the other side, so keep that in mind!!! I am not including that portion in this tutorial, but if you need help, email me!
* If you require electric choke lead, add it now!!!!!!!
13.) You will need one crimp connector for the starter hookup on the "S" terminal. Determine what size you need, and crimp that sucker on your wire. If you have heatshrink, use it as well.
14.) Ok, so now we should have all the connectors installed, and the wires ready for installation back into the bulkhead connector. Crimp your new or old bulkhead pins on your wires.
15.) Insert your pins and wires back in the bulkhead connector in the order that you recorded, Make sure you get them correct!!!
16.) All you have left is to wrap the harness in electrical tape. You have several options here. You can get the factory correct tape, or standard black available at any hardware store. I chose to go with colored wire wrap, it is available in several different colors, it is sometimes called "Phase Tape". Your finished product should look similar to the below pics. Notice I removed the oil and temp wires from mine since I am running autometer guages.
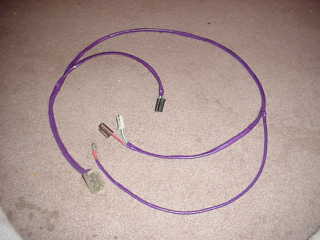
That is all she wrote!!! hook up your new harness and enjoy the HEI!!!!
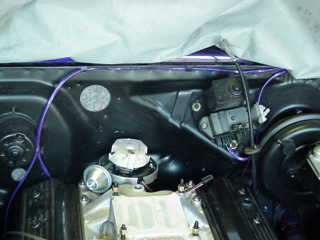 Here it is installed!
![]()
![]()
This site created and operated by BABYDEUCE!
This is a non-profit enthusiast site for those who enjoy Chevrolet Chevy II/Novas and is for informational and enjoyment purposes only. The Chevrolet, Chevy II and Nova logos and names are all registered trademarks of General Motors Corp. The Chevy II SS shield logo is a registered trademark of the National Nostalgic Nova association.